EQ
What is it?
Equalization is the process of adjusting the volume of different frequency bands within an audio signal.
- in other words, they can be thought of as frequency-specific volume knobs
Equalization is commonly used to increase the depth of a mix, creating the impression that some sounds in a mono or stereo mix are farther away or closer than others
There are 2 general approaches to EQ:
- EQ the sound in isolation
- this is primarily done to change the sound of the instrument, and potentially make it sound more interesting (which might mean less natural).
- not every instrument needs EQ at this stage
- the boundaries within which you can be creative with EQ is limited. Extreme reverb and extreme delay can be used to great effect in a mix, but outside the parameters of what is considered "right", EQ can quite easily sound bad.
- EQ the sound as part of the whole mix
- this approach is necessary
It is generally considered uncommon for specific sounds to change EQ during a mix (ref)
- it can be done, but it is very noticeable. Aqualung (Jethro Tull; vocals) and Wish You Were Here (Pink Floyd; the acoustic guitar) are good examples of this.
It is advisable to be wary of advice to "always mix a certain instrument in a certain way". Instead, each suggestion needs to make sense given the circumstances (ie. what genre of song you have, how the mics were placed etc.)
Relative EQ
Consider the idea that we can view volume as a relative function that is made up of all tracks occuring simultaneously.
- That is, the only "loudness" of a sound is how loud it is compared to the others.
This is much the same for EQ, and we can compare the relative EQ of each sound at each frequency range.
- we can create various EQ relationships at each frequency range (highs, mid-range and low)
- spec: that means we can mix the lows as a cluster, the mids as a cluster, and so on
Mirrored Equalization
Instruments with similar frequency (such as bass guitar and kick drum) will compete with each other in the mix. Mirrored equalization is the process of boosting one and cutting the other so that they both stand out.
How do we do it?
- Try to EQ everything to sit right in the biggest section (presumably the chorus or bridge), and work backwards from there.
- Try volume automation before you start automating EQ.
- If volume automation can’t get the right balance, maybe try splitting some instruments or vocals into Verse and Chorus tracks. I find this easier to manage than parameter automation.
- If that still isn’t enough then maybe go for EQ automation. But keep it simple. 90% of the battle of mixing is getting in control of the balance; you don’t want to overcomplicate things.
- Can’t overstate how each part’s melodic range (top to bottom) contributes to a good EQ balance. I find if I’m EQing drastically, it’s most likely a musical problem that needs to be addressed. E.g. if two instruments are playing in the same melodic range as the vocal... no amount of EQ is going to solve that musical problem.
It is generally a good idea to sequentially EQ sounds that occupy a similar frequency space.
- ex. After EQing mandolin, we might want to EQ the lead acoustic guitar, which will allow us to more methodically carve out sufficient frequency space for each instrument.
Frequency Spectrum
See p.76 of ReaMix for all frequency ranges and the special attention each much be paid to successfully EQ.
Presence zone
The "presence zone" is found in the frequency range of 2.5-5 kHz.
2.5-5 kHz is the frequency range the human ear is most sensitive to. It’s what your listeners pick up on first and remember best. Any sounds within that range will be more easily heard by your ears, and sound closer to you.
- because of this, a 1dB boost in this area might be comparable to a 3dB boost in any other range, which is why we have to take care boosting in this area.
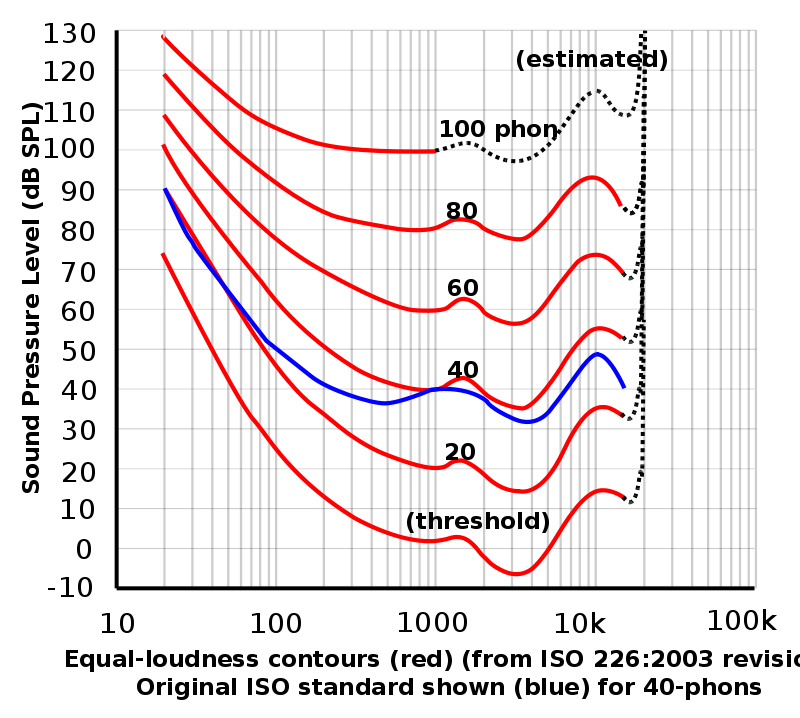
- this concept can be illustrated by the Fletcher Munson curve, which illustrates what dB boost we need to give at each frequency in order to attain the same level of perceived loudness (measured in phons). We see that the curve rises on both the low end and high end, showing that we can't easily hear low frequency sounds or high frequency sounds.
- we can use this graph to get an idea of how sensitive each dB boost in EQ for a given region will affect the perceived loudness. Clearly, around 3000Hz-4000Hz we need to boost very gently.
Making room in the presence zone for lead vocals is a classic choice. But whatever element of your mix you want front and center should occupy some of the presence zone if possible.
Filters
High-pass filter
- A high-pass (aka low cut) filter passes higher frequencies well but attenuates (cuts or decreases) lower-frequency components.
- a rumble filter is a high-pass filter that cuts out the low frequency end of human hearing (20-40 Hz range)
Low-pass filter
- A low-pass (aka high cut) filter passes low-frequency components of signals while attenuating higher frequencies.
Shelving filter
- A shelving filter can be used to reduce or increase signals above or below a set frequency
- any time we see bass and treble knobs on a speaker, these are shelving filters.
Corrective EQ
Boominess
If an instrument sounds too "boomy", take off a few dB around 200Hz
Muddiness
If an instrument sounds too "muddy", cut the level around 300Hz
Irritation
Especially with percussive instruments, where this occurs try cutting around 2000Hz-4000Hz range.
Twanginess
Can occur with plucked instruments. Cut volume around 1000Hz-4000Hz range.
Thinness
Where an instrument sounds too thin, try reducing volume around 5000Hz-8000Hz range.
Hiss
Where an instrument sounds "hissy", try rolling off above the 8000Hz mark.
Tips
Rename the instance of the EQ FX to describe what its purpose is (ex. EQ: Fix Muddiness, EQ: Add presence). Make this the first plugin in the chain, then consider this FX instance to be locked.
- this is a general tip for any FX.
In most cases the low-low end of the frequency spectrum should be cut, even if it is a bass instrument.
- therefore, we should enable a high pass filter and sweep until the tone of the instrument starts to change, then back off. You shouldn't really notice a difference between the before and after
- we don't really hear these frequencies anyway, and they only really produce an energy that can contribute to muddiness.
- this isn't the case for some genres like EDM.
Consider what happens when you boost the frequency range that your transients sit at. You are essentially doing the opposite of what a compressor does. While a compressor will reduce the dynamic range of a sound (ie. make the loudest part quieter, which is the transient), boosting that frequency range will have the opposite effect.
Consider the different components of a single sound. When EQing, try and make all the individual sounds of a given source stand on its own. Make it so you can hear each component of the sound clearly. This usually is achieved by removing frequencies that are not part of these main components.
- ex. a bass not only has the main tone, but also the sound of the fingers on the strings
- ex. a kick drum not only has the "boom" sound, but also the sound of the beater on the drumskin. Since the boom sound is at a low frequency and the beater is at a higher frequency, we can usually boost the beater frequency a bit, and cut a bit between the beater and the "boom"
Questions
Is it a bad idea to put a double tracked instrument (e.g. vocals) into a bus, and apply EQ to the bus? Or should be EQ each take with its own instance of the FX? even if we just copy and paste it over.
Resources
Backlinks